Tuesday, 15 September 2020

Tersa Knives and Planer Blades – Production and Quality


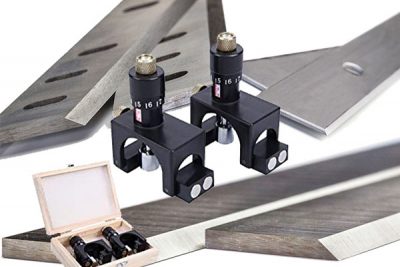
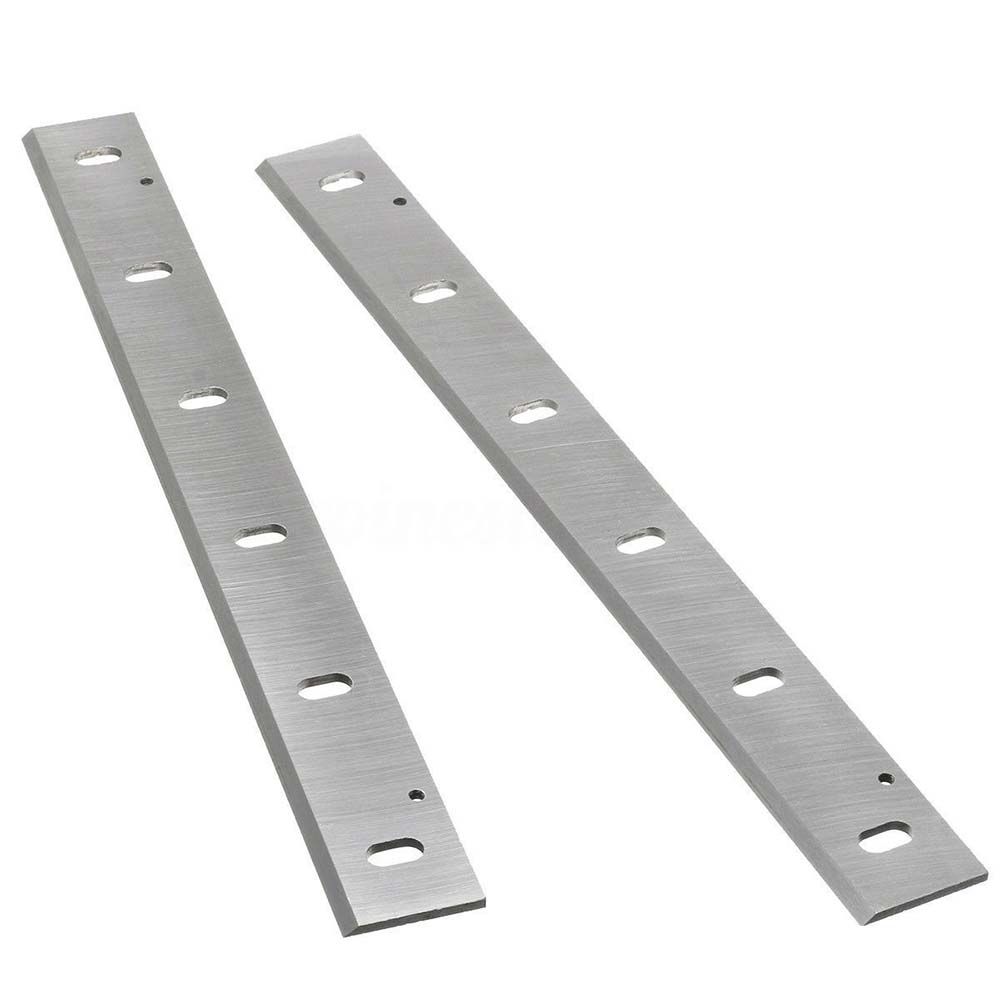
Woodford Woodworking  machinery and Tooling Ltd Supply a complete range of tooling as a  one stop source for all Tersa blades, Planning Blades Band saw blades and router cutters are  just some of our main products.   As we cut all our Tersa Blade knives and planer blade knives from Tersa on the roll to planer blades in long lengths, Then pack the planer  blades and Tersa Blades to the individual customer requirements  on a daily basis we can supply any length of Tersa  and planer blades within minutes if required to meet our customer demands.

Our flexibility in meeting customer demand  with Tersa and planer knives  means we can supply any length of blades to fit any woodworking machinery  with in the same day for dispatch meaning our customer don’t have to carry large and expensive stocks of  woodworking Tooling just sat on the shelf.

Tersa Knives available are Genuine Swiss Hss very high quality high speed steel precision ground to extra fine tolerances For a  high quality finish on general Joinery and furniture production.

Tersa Genuine Swiss M42+ special designed High cobalt Tersa blades for longer life span for use on timber such exotics as  hard woods  giving an extra 35% life more than the standard Tesa Hss

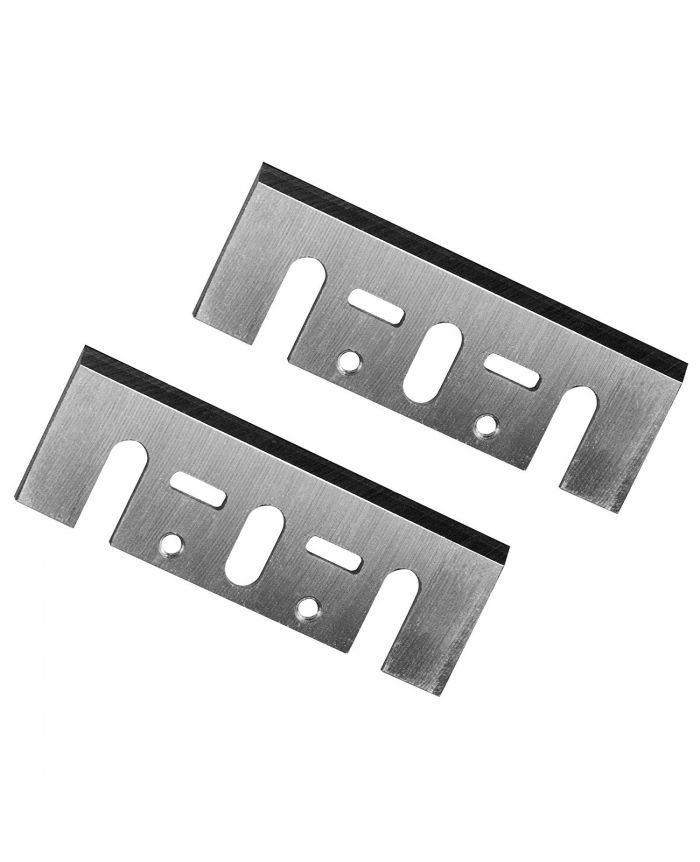
Planer Knives  We only supply High Tungsten T1 18% high quality knives for our wood working machinery  or solid high grade Tungsten planer knives for our Hand held such as Dewalt  Makita Bosch  , We are able to match our customer requirements on a daily basis by cutting every planer blade in house ourselves and shipping  the same day to give top quality customer service to match our top quality planer and Tersa blades  We can cut a, our Tersa and Planer blades to fit any woodworking machine Such as SCM, Wadkin, Rojek ,Sedgwick,Weinig and many more. Categories: Buying Guides

Thursday, 3 September 2020

Why to Use a Featherboard?

 Working on saw machine and using feather board along with the fence is just like working with extra hands! Featherboards keep your fingers safe and in good shape while operating power saws.

Featherboard:


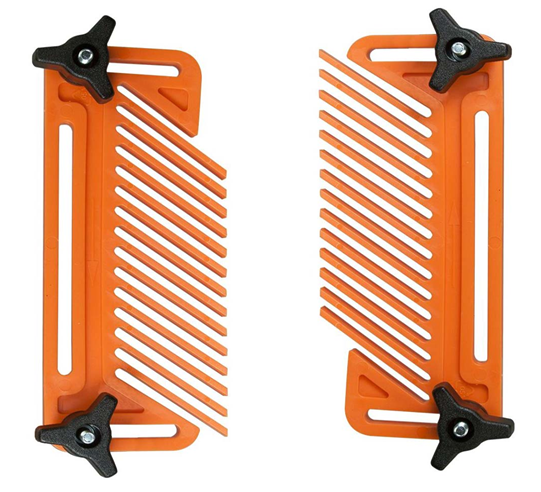
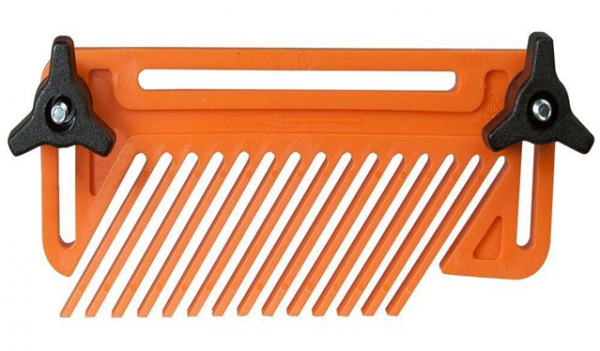
Feather board is basically a safety device. It is used when working with stationary power saws like bandsaws, table saws, mitre saws shapers, router tables, radial arm saws etc. A feather board is simply a board with a series of defect free slits cut into a uniform fixed angle like 45 degree, forming a row of flexible fingers that bends just like the barbs of a feather. It applies pressure against the wood to be cut and keeps it flat on the saw machines table or the fence while steering the work piece to the blade.

A feather board can also be created at workshop from an approximately 3/4 × 3 × 11 inch piece of straight grained, defect-free wood, cut crosswise at a 45-degree angle on one end. Many slits parallel to this direction of the grain can be cut manually but creating a good defect free feather board is a time consuming and tedious task. So, purchasing a good one will prove its worth in the long run and save your precious time too.

Features of Featherboard:

  • Featherboards are usually made from a high quality polymer and each feather board consists of angular slits known as fingers.
  • The angle of the fingers allows the wood piece to pass in an unwavering, straight line but offers resistance movement in the opposite direction.
  • These fingers exert some pressure on the work piece to be cut while feeding to the saw that produces cleaner cuts with rare chances of kickback, chattering or displacing of work piece.
  • It comes with wedge-lock hardware which works in T-slots or miter slots on table saws, router tables or band saws.
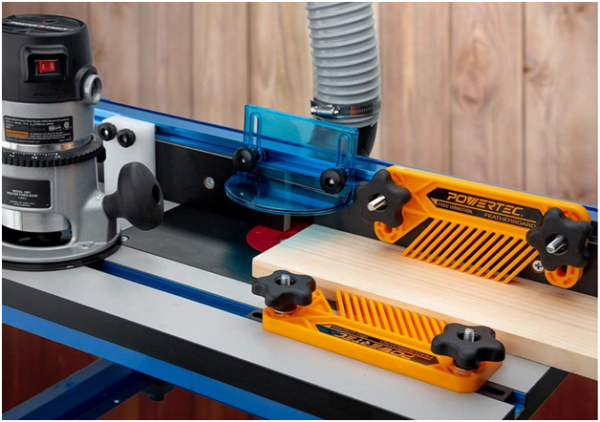
  • The featherboard slide into miter-gauge slots in the router table or fence, and are locked in place by tightening a pair of knobs attached at the ends.

Key Benefits of Using Featherboard:

  • The most important benefit is again your safety. It keeps your hands and fingers safe while feeding wood piece to the saw machine.
  • It enhances the accuracy and quality of cuts tremendously.
  • It can be connected to its place very easily and quickly.
  • It is useful for edge jointing, and making moulding on router tables.
  • It performs especially well at the table saw and router table. It can also be used on shaper, band saw or any other woodworking machine with a miter gauge slot.
  • It takes care of the thin wood pieces, especially when feeding wood piece by hand is somewhat difficult.

Double Featherboard:

Using double featherboards give extra control over feeding mechanism. On router tables and shapers, you can use one featherboard before and the other one after the cutter. It is a good practice to attach featherboards to both the fence and the tabletop while routing long and thin wood piece on the router table.

Where to Get One?

Featherboard is a specialty tool and hence may not be available at your local stores but will be stocked at high quality building supply stores and woodworking tools dealers. You can also place your online orders from here in case you are searching for some good quality at decent price.

How to Use a Featherboard?

Using featherboard is quite simple and a quick process. A purchased featherboard will easily slide in the mitre groove on your table saw. Place the featherboard with fingers aligned in the direction in which the wood piece is fed.

The saw blade should never touch the fingers of the featherboard so just keep it little bit away from the blade. Also, make sure that its both the knobs are properly tightened so that the wood piece is secured and moves in forward feeding direction only.

For the most accurate cuts, lower the blade with the tool off and place the stock against the fence. Now, set the featherboard against the wood piece and tighten the locking mechanism with knobs attached. Test the wood piece if it is fixed properly or not in a dry run with the blade lower down. Ideally, the work piece should move in forward direction and not move back. Now, raise the blade up and push the wood piece for cutting.

Wednesday, 19 August 2020

Cabinet Scraper Set; A Daily WoodWorking Tools For Your Wood Shop


cabinet scraper (sometimes called a ‘card scraper’) is a woodworking tool used for shaping and finishing.Scrapers are arguably the most simple tool used in woodworking. Typically made of thin carbon steel like that used to make hand saws, they’re sharpened by creating a hook or burr on their edge. A cabinet scraper (sometimes called a ‘card scraper’) is a woodworking tool used for shaping and finishing.Scrapers are arguably the most simple tool used in woodworking. Typically made of thin carbon steel like that used to make hand saws, they’re sharpened by creating a hook or burr on their edge. The name ‘cabinet’ is used because scrapers are versatile and important tools for cabinet makers.Cabinet scrapers traditionally resemble a simple blade with no handle, but there are other, more complex designs available, which are explored further on.

Scraper_Rectangular

There are Three Scrpers and esch have different shape Like Flat, Concave and Convex.

The rectangular scraper Cabinet Scraper 5″ is the most common and does a great result of smoothing flat surfaces.Cabinet Scraper A “must” for woodworkers! Made from high quality carbon steel, cold rolled, hardened and tempered, and with specially ground cutting edges. Ideal for smoothing hardwoods, removing paint and varnish etc. Flat Profile Cabinet Scraper. Size: 125 x 62mm (5 x 2 1/2in).

The Concave Convex Hollow has two long flat edges like the rectangular scraper, but each end had a radius. Wood Cabinet Scraper Concave Convex Hollow 140 x 50 x 0.8mm. UK Made. W3341 The Convex/concave scraper (2″ x 6″) can obviously be used at either end to fit hollows and rounds. It may also be used as a flat scraper along its parallel edge. The points at the concave end are ideal for scraping in narrow grooves.

Concave Convex Hollow

The Gooseneck Cabinet Wood Scraper Woodworking Craft Tool All our Wood Scrapers are made in United Kingdom from Carbon Steel, with a hardness rating of RC40/42, 60 temper.steel temper varies from 9 – 20 which is dead soft, up to 85 which is very hard) This 60 temper rating gives our scrapers a better balance of holding a Sharper edge, being able to be resharpened, and with enough flex in the blade to give good tool control.

Goose Neck

Sharpening a scraper is a simple process and can be done quickly.As with any other quality cutting tools made from high carbon steel, these scrapers require a bit of maintenance to prevent rusting. We recommend wiping your card scrapers clean and applying a light coat of oil before storing in a safe, dry place.

Friday, 31 July 2020

HOW TO USE TENONING JIG?

Tenoning Jig

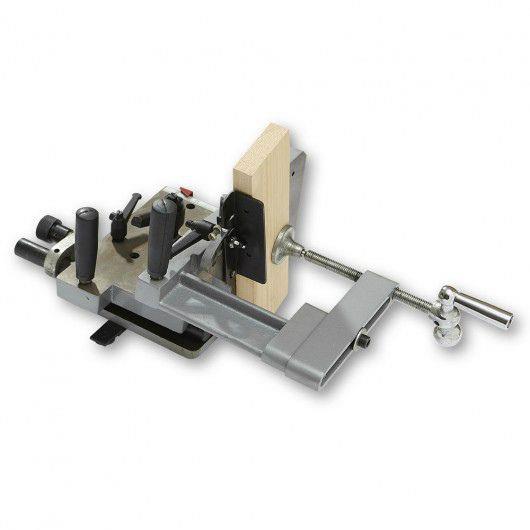
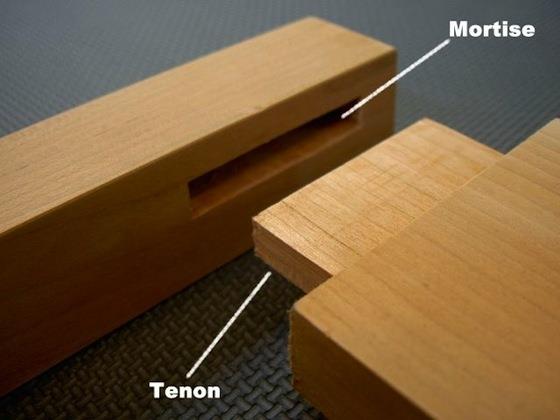
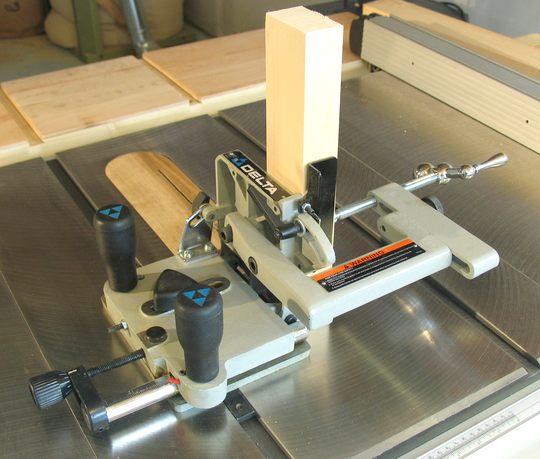
Tenoning Jig is a wonderful accessory tool that not only makes your work fast and hassle free but also helps you to create very precise smooth cuts, especially for tenons in wood. It simply locks the board upright as you pass it across the saw blade. The locked board doesn’t move at all and the blade can cut the cheeks and shoulders of a tenon very accurately. Cutting a tenon from all the four sides makes it fit perfectly in the joint and also conceals it completely.

Woodford Tooling caters all the demands of woodworkers. Being a leading supplier in UK and overseas, it provides the best quality cutting machines, blades and even accessory tools at special discounted offers that makes wood cutting easy and enjoyable task.

Key Features of Tenoning Jig

  • The basic task of Tenoning Jig is to help in cutting smooth tenon that creates strong long lasting glue joints. It can also be used to cut grooves and dadoes out of wood when attached with suitable table saw.
  • It usually comes with adjustable angle settings that can be set for cutting straight, angled or mitered tenons. Standard 3/8″ x 3/4″ mitre bar fits most mitre gauge slots including T-slots of this standard size.
  • Its heavy cast iron construction provides extra stability which holds wood firmly while cutting tenons.
  • It has built in clamps which lock the wood piece during cutting so that it doesn’t move while cutting.
  • It comes with extra large handles that make it easily operable. Long handles also take care of your safety while operating the table saw along with Tenoning Jig.

What is a Tenon and Mortise Joint?

Ancient houses in Germany, about 7000 years ago, holds back the history of the oldest preserved wooden frame architecture of the World. These frames were connected to each other by tenon and mortise joint. Then, these joints were used extensively by Romans in wood frame work and stonework. We can call the tenon and mortise joint as the strongest joint that the woodworkers ever make. These types of joints are used to join two pieces of wood placed at 90 degree angle to each other. These joints can be created very easily and are also very long lasting.

How a Tenoning Jig Works?

Setting up Tenoning Jig and using it is quite simple but before setting up Tenoning Jig, you should raise up the table saw blade and make sure that the blade is square to the side table. The blade should also be parallel to miter gauge slot in the table as the Tenoning Jig rides there.

  • Attach Tenoning Jig to the Table Saw.
  • Place a board or wood piece to be tenoned against the fence on Tenoning Jig and supported by a back support plate that holds the board upright.
  • When the board is at the right position you have to lock it down with the help of clamp handle attached to it so that it doesn’t move.
  • The fence assembly is attached to a heavy duty cast iron assembly base which slides with the help of bar on the miter gauge slot on the table.
  • Make a mark on the board for the tenon.
  • A stop piece keeps the board square in both directions.
  • Turn the fine adjustment knob attached to Tenoning Jig in order to line up the marks on the board with the teeth of the blade.
  • Lock down the jig with the handle attaches to it and set the height of the blade for the tenon.

You can also put some paste wax on the table saw table and on the bottom of this jig. This will ensure that the jig will slide smoothly over the miter gauge.

Now, your Tenoning Jig is ready to be used for cutting tenons. You can cut as many tenons as you like. It always ensures your safety and provides you with the smoothest tenons when used along with the blade.

So, a Tenon Jig is just not an accessory but a must have tool for your workshop. Hurry up and avail the lowest price offer..buy online now!!


Tuesday, 21 July 2020

Optimise Performance of Planer & Jointer Machine with Planer Blade Setting Jig

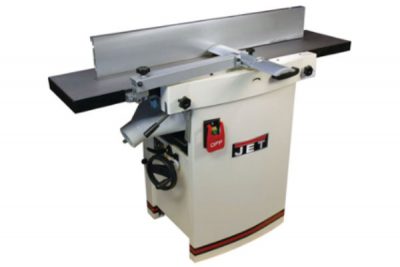
Not able to set your planer knives perfectly?? Add up a planer blade setting jig to your tool set and wash out all your doubts about knives properly set or not. Add extra life to your knives which are not set properly by setting them up with blade setting jig. If the knife is set precisely at its place, it will not dull abruptly in short period of time and hence the performance of your Planer & Jointer Machine will be optimised in the long run.

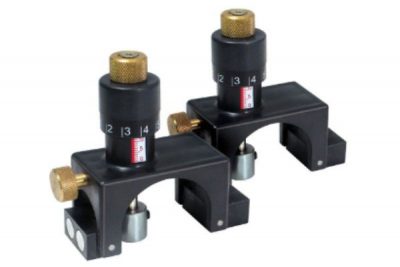
A pair of adjustable magnetic planer jointer knife blade setter jig gauge makes installation of planer and jointer knives quickly in a trouble free manner. It can be used either for mounting High Speed Steel (HSS) planer knife or Tungsten Carbide Tipped (TCT) knives perfectly in your cutting machine. HSS blades are very sharp and yields smoothest planning results while TCT knives are relatively less sharp but remain sharp 5 times longer than HSS knives.

Planer blade setting jig comes with highly accurate planer knife vernier setting for optimum results. Its Magnetic feet attach solidly to the cutter block and hold the knife with strong magnets as intended. Knife held up securely by magnets of cutting jig leaves your hands free to work on the jibs and cutter block. It comes with easy locking Swivel feet and can accommodate block diameters ranging from 65mm to 125mm. With adjustable and lockable micrometer setting and magnetic feet, all the knives in the cutting block can be set accurately to the same height.

A properly installed planer knife will last for a longer time. If the knife is not installed properly, it will still cut but will die out soon and will result in high incurred cost eventually. In case you are searching for one, we’ll be happy to cater you. We offer fast delivery service worldwide. Moreover, all of our machines, and most other brands too, are supplied with a low cost knife setting tool.


Woodford Tooling offers you planer blade setting jigs at very low cost. The jigs can be used with most planers, thicknessers or combination machines. All you need is access to the cutter block, in most cases this means lifting up the planer beds or removing one of the tables completely. In the centre of the jig is a setting rod with another magnet for holding the tip of the blade, during setting.

Easy way of Installing of Planer Knives:

Installing a new sharp knife using planer blade setting jig not only makes your hands free but also keeps you safe from injuries. You can also reinstall your old knives if you feel they are not accurately fixed to the cutter block. Usually cutter block is fitted with 3 or 4 planer knives.

Go through your machine manual in order to find out how much part of the knife should be revealed out the cutter block. Unplug your machine from power supply.

Finding Out Zero Default Value:

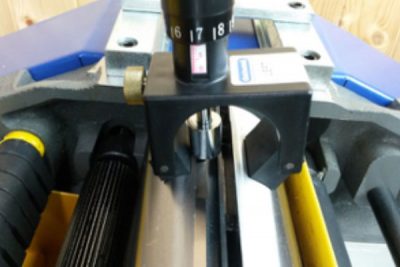
Loosen up the set screw knobs at the top of the jig. Place the planer blade setting jig in the center of the cutter block. You have to carefully place each jig at the same place on the cutter block so that your knives’ height couldn’t vary from end to end. Varying height of knives could affect efficiency and produce inconsistent and undesirable planning results.

After properly positioning the jig, secure the center bar by tightening the set screw knob. Record the setting of the jig somewhere. This is zero value of the jig as per your cutter block. Repeat this for all the jigs. You could further fine tune the jig according to your instruction manual of machine with the help of micrometer attached to the jig in order to fix it most accurately.

Installing Knives:

Remove the old planer knife and clean up the cutter block and the gib. After cleaning, applying a thin oil coat will avoid corrosion in the long run.


Replace the old worn out knife with your new knife. Keep the knife slightly above the others for allowing the jigs to “push” the knife into proper position. Next, tighten the gib bolts just enough to allow for movement.

If you are placing more than one jig, make sure that they are equidistant from each other i.e. placed evenly at equal distance.
Once all of the jigs are set in the proper position, secure all the gib bolts one at a time gradually. Turn each bolt a single time and move to the next bolt. If bolts are not accessible due to jig placement, complete securing all of the other bolts and then try to secure the inaccessible bolt.

Repeat this process for all remaining knives.

Your knives are installed properly now.

Important: If for any reason your knives have been re-set higher than before, it is an absolute must that the chip breaker and feed rollers be adjusted so they are below the level of the knives at the bottom of “dead centre”. For more information on how make this adjustment, refer to your planers owner manual.

Dull and worn out knives defines the efficiency and productivity of your machine. So, in case you want to replace your old and dull knives, catch up with us and order new planer knives. We are largest stockiest of planer knives and that’s why we provide our customers with best section options.


Wednesday, 8 July 2020

Which One is the Best- HSS or TCT Planer Blade?

Are you planning to replace the worn out knife for your saw machine but are confused whether to go for HSS or TCT Planner Knife? Don’t worry! You are at the right place. Here, we’ll try to explain the basic difference between a HSS and TCT Planner Knife, thereby making it easier for you to decide which Knife is best suited as per your requirements.

HSS [HIGH SPEED STEEL] planer knives:

Plane Knives

  • High speed planer knives are also known as HSS. The high-speed steel type was patented in the year 1983.
  • High speed steels are basically alloys that possess their properties from various alloying metals that are added to carbon steel. It generally includes tungsten and molybdenum, or a combination of these two, often with other alloys as well.
  • All types of HSS belong to the Fe–C–X multi-component alloy system where X represents chromium (Cr), tungsten (W), molybdenum (Mo), vanadium (V) or cobalt (Co). Generally, the X component is present more than 7%, along with more than 0.60% carbon.
  • The addition of about 10% of tungsten and molybdenum in total maximize the hardness and toughness of HSS and maintains those properties at the high temperatures that are produced while cutting metals.
  • As the hardness of the material increases, you can use high speed steel with higher cobalt content (5% or more). So, if the material that you need to cut is hard, you can opt for a blade with high cobalt content.
  • High Speed Steel (HSS) planer blades are sharper than TCT blades, which delivers the smoothest planing result.
  • These blades cuts quickly and are cheaper than TCT blades.
  • These blades dull out faster than TCT so require to be replaced or re -sharpened frequently. These knives are less brittle therefore can be sharpened easily.
  • It is often used in power-saw blades and drill bits.
  • HSS knives were generally designed to be used with solid wood like cutting logs for firewood, slicing, re sawing, veneering, re shaping of both hard wood and softwood.


We, at Woodford Tooling, sell high quality HSS planer blades and ship these all over the world. You can browse and select best HSS blade from our exciting offers. You can buy HSS planer blades from here.

TCT [TUNGSTUN CARBIDE TIPPED] planer knives:

Planer blades TCT

  • TCT (Tungsten Carbide Tipped) planer knives are also called HM (Hard Metal) Knives, are either solid carbide planer knife or coated with Tungsten Carbide (TCT). Tungsten carbide gives features of toughness, hardness, wear resistance and shock resistance. Tungsten Carbide Tipped blades were patented in the year 1985.
  • TCT coated knives are less sharp than HSS ones. They give less smooth result than HSS blades, but the result is still agreeable.
  • The tungsten carbide tips are capable of operating at much higher temperatures than solid HSS, therefore, TCT saw blades are usually run at much higher surface speeds. This allows carbide-tipped blades to cut at faster rates and still maintain an acceptable chip load per tooth.
  • The biggest advantage of these knifes is that these stays sharp, usually about 5 times longer than HSS knifes.
  • These blades are more expensive than HSS blades but prove to be more cost effective in long run.
  • TCT saw blades are specifically designed for cutting metal tubing, pipes, rails, nickel, zirconium, cobalt and titanium-based metal.


It’s really hard to beat our prices with the quality of blades that we offer. If you already know the size of your TCT planer Knife or name and model of your machine, hurry up to buy best planer knives at our special discounted prices!


How to decide?

If your task involves wood cutting than doesn’t requires much accuracy and smoothness, HSS planer blades would work just fine for you. These blades will finish up your work faster as these cut quickly and will also save time, energy and overheads like power consumption etc.    

If your work to be done demands high quality accurate results and overweighs all other parameters, then TCT knives would perform well. These works best for metal cutting work.

If you’re looking at long jointer blades, HSS is a proven material, and in case your blade gets shattered down by running nails accidently through your machine, these blades aren’t very expensive to replace.

If you’re looking at a cutter head with segmented knives or inserts or hand held saws, carbide or TCT planer knife is a good choice.

Woodford Tooling is proud to be the largest stockiest of all type of planer blades in UK. If you need further assistance or looking for a specific size? We can further cut these blades to any custom length in order to meet up your requirements. Please feel free to contact us or call us at +44 (0)161 439 5683 and one of our technical advisers will assist you with any query which you might have.

Monday, 25 May 2020

How to Install Bandsaw Blade

If your bandsaw blade isn’t moving consistently while cutting and is becoming noisy or squeaky day by day, it’s sending signals for change. No matter how much carefully you handle it, after a constant usage the blade becomes dull or you’ll find some missing tooth in it. A dull blade will heat up much faster than a blade in good condition and will eventually lead to more serious problems like hairline cracks. It should be replaced immediately.

Need to buy new bandsaw blade? Woodford Tooling can supply thousands of different sizes of bandsaw blades for most of models.


CHANGING BANDSAW BLADE

Changing bandsaw blade can be roughly divided into two phases: Removal of the worn out old blade and installation of new blade.

Before you get started, you have to make sure that the band saw is disconnected to power supply and unplugged.

Phase I: Removal of Worn Out Bandsaw Blade

  • Open up the guide assemblies and remove the guide blocks. A bandsaw blade  has two assemblies, one above the table and the other below the table. These assemblies prevent the blade from flexing and twisting while it is making the cut. When guide blocks are removed from the assemblies the blade becomes loose.
  • Raise the blade guard and guide assembly for getting to the throat plate in order to remove it. Remove the necessary table parts of bandsaw like the pin or the bolt that keep the table aligned at 90 degree.
  • Open up the access doors and the blade guard. The blade guard covers the blade as it travels upwards from the bottom tire to the top tire, and protects you in the case of blade breakage. Then release the tension on the blade from both the assemblies. This can be done by quick release lever or manually by turning wheel.
  • Now, remove the blade off the top wheel and guards and then simply slide through table slot or in some cases, the blade has to be turned 90 degrees and then slide it out of the slot.

Phase II: Installation of New Bandsaw Blade

  • Before we mount the new blade, it is ideal time for checking the rubber tires on the wheels of assemblies. The dust or debris collected should be cleaned using metal scraper.
  • For mounting the blade in the bandsaw, just slide the new blade through the slot. Guide the blade into the blade guards, and roughly center it on both the wheels.
  • Now, you need to apply the tension. Wider blades require more tension. Tension should be checked manually by rotating the wheel.
  • Turn the wheel slowly and watch how the blade tracks. Use the tracking knob for aligning the blade to the centre of wheel. Once the blade stays centered for several revolutions, final tension can be applied.


  • You will notice some type of tension scale on your bandsaw based on the width of the bandsaw blade. What you’ve do is to turn the blade tension hand wheel until you’re very close. Then perform the final tension test on the blade. Try to flex the blade with finger very lightly. It should move just about 1/4 of an inch.
  • For resetting the guide, first lower the assembly down. Adjust the thrust bearing so that it is approximately about the thickness of a playing card behind the blade, and then tighten it. Then slide the guide assembly forward until it’s behind the gullets on the blade’s teeth, and tighten it in place.
  • Adjust the upper ball bearing guide and then adjust the upper guide blocks. The guide blocks should be placed very close to the blade but should not touch it.
  • Repeat these adjustments for the lower blade guides.
  • Fix the throat plate at its place and then the table alignment bolt or pin.

If you need to buy new bandsaw blade, we highly recommend buying from Woodford Tooling which supply best quality bandsaw blade and great customer service if you run into any problem while installing your bandsaw blade.

Your blade is now installed properly and the bandsaw is ready to cut.